KS0293 Keyestudio Relay Breakout Board for micro bit: Difference between revisions
Keyestudio (talk | contribs) |
Keyestudio (talk | contribs) |
||
| (39 intermediate revisions by the same user not shown) | |||
| Line 1: | Line 1: | ||
<br> | |||
<br>[[File:Ks0293.png|500px|frameless|thumb]]<br> | |||
<br>[[File:Ks0293.png|500px|frameless|thumb|right| ]]<br> | |||
<br> | |||
== Introduction == | == Introduction == | ||
micro bit is | The [http://microbit.org/guide/features/ BBC micro:bit] is a powerful handheld, fully programmable, computer designed by the BBC. It was designed to encourage children to get actively involved in technical activities, like coding and electronics. | ||
Keyestudio relay breakout board for micro:bit has integrated a 4-way 5V relay module, fully compatible with micro bit development board. It can work only need to insert micro bit into keyestudio relay shield, then input | It features a 5x5 LED Matrix, two integrated push buttons, a compass, Accelerometer, and Bluetooth. <br> | ||
4-way relay on the board is active | It supports the PXT graphical programming interface developed by Microsoft and can be used under Windows, MacOS, IOS, Android and many other operating systems without additional download of the compiler.<br> | ||
<br>[[File:KS0293 (8).png| | Keyestudio relay breakout board for micro:bit has integrated a 4-way 5V relay module, fully compatible with micro:bit development board. <br> | ||
It can work only need to insert micro:bit into keyestudio relay shield, then input DC5V voltage on the relay VIN/GND port, pretty simple and convenient.<br> | |||
The 4-way relay on the breakout board is active HIGH. Its control terminals are respectively connected to P4, P3, P7 and P6 of the micro:bit development board. You only need to control the high or low output level of P4, P3, P7 and P6, thus control the 4 relay on/off. <br> | |||
<br>[[File:KS0293 (8).png|600px|frameless|thumb]]<br> | |||
<span style=color:red>Note: <big>'''we adopt V1.5 micro:bit in the whole tutorial, but our tutorial is also compatible with the latest version micro:bit. | |||
When doing experiment with latest micro:bit, you need to transfer code into Makecode online editor first, save code again then download it to micro:bit.'''</big></span> | |||
<br> | |||
== Parameters == | == Parameters == | ||
* Input Voltage:DC 5V | * Input Voltage:DC 5V | ||
* Working | * Working Mode:active at High level | ||
* Contact Capacity: AC120V/3A | * Contact Capacity: AC120V/3A ; DC24V/3A | ||
<br> | |||
== PINOUTS Diagram == | |||
<br>[[File:0293图片1.png|800px|frameless|thumb]]<br> | |||
<br> | |||
== Test Program == | |||
You can make the code below on the [https://makecode.microbit.org/#editor micro:bit Blocks Editor ] ; finally save the code and send it to your micro:bit. <br> | |||
<br>[[File:Microbit-0293.png|500px|frameless|thumb]]<br> | |||
<br> | |||
== Test Result == | |||
<br>[[File:Ks0293-(2).png|600px|frameless|thumb]]<br> | |||
Insert micro:bit development board into keyestudio relay breakout board; send the code to micro:bit main board and power up, you can see the 4-way relay is connected and then disconnected one by one. <br> | |||
== | <br> | ||
<br>[[File:Ks0293- | == Go Further == | ||
You can connect the additional circuit to realize your project designs.<br> | |||
<span style=color:red> Note that here we use a power transfer module to supply voltage input 5V. </span> <br> | |||
Finally the leds on 4-way relay breakout board are connected and then disconnected one by one, and the external LEDs are on and off one by one, circularly.<br> | |||
<br>[[File:Ks0293-(4).png|800px|frameless|thumb]]<br> | |||
<br> | |||
<span style=color:red> '''Note that''' the display accessories Not Included in the shipping list. </span> <br> | |||
<br> | |||
== Resource == | == Resource == | ||
'''Datasheet | |||
https:// | '''Download Datasheet and Code:''' <br> | ||
https://fs.keyestudio.com/KS0293 | |||
* [http://microbit.org/ BBC micro:bit website ] <br> | |||
* [https://makecode.microbit.org/ Micro:bit MakeCode Block Editor ]<br> | |||
* [http://microbit.org/guide/ Meet micro:bit starter programming] <br> | |||
* [http://microbit.org/guide/features/ BBC micro:bit Features Guide ] <br> | |||
* [http://microbit.org/guide/features/ BBC micro:bit Safety Warnings ] <br> | |||
* [http://microbit.org/guide/quick/ BBC micro:bit Quick Start Guide ] <br> | |||
* [http://microbit.org/guide/hardware/pins/ BBC micro:bit Pins ] | |||
<br> | |||
== Buy From == | == Buy From == | ||
You can get one now from the links below: <br> | |||
*[https://www.keyestudio.com/keyestudio-relay-breakout-board-for-bbc-microbit-p0110-p0110.html '''Official Website''' ] | |||
*[https://keyestudio.aliexpress.com/store/group/Micro-Bit-series/1452162_512519378.html?spm=2114.12010608.0.0.e6c4553a45ukFz Shop on AliExpress for micro:bit series] | |||
[https://keyestudio.aliexpress.com/store/group/Micro-Bit-series/1452162_512519378.html?spm=2114.12010608.0.0.e6c4553a45ukFz | |||
*[https://www.amazon.com/stores/page/8E904EFD-AB57-4202-B8F4-0EFDAC42E6B4?ingress=0&visitId=8ebc59f7-7291-48b2-9958-0ac8502eac86&ref_=w_bl_hsx_s_pc_web_13497667011 Shop on Amazon for micro:bit series ] | |||
[https://www.amazon.com/stores/page/ | |||
[[Category: Micro:bit]] | [[Category: Micro:bit]] | ||
Latest revision as of 10:17, 9 March 2021
Introduction
The BBC micro:bit is a powerful handheld, fully programmable, computer designed by the BBC. It was designed to encourage children to get actively involved in technical activities, like coding and electronics.
It features a 5x5 LED Matrix, two integrated push buttons, a compass, Accelerometer, and Bluetooth.
It supports the PXT graphical programming interface developed by Microsoft and can be used under Windows, MacOS, IOS, Android and many other operating systems without additional download of the compiler.
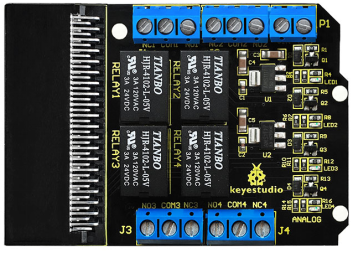
Keyestudio relay breakout board for micro:bit has integrated a 4-way 5V relay module, fully compatible with micro:bit development board.
It can work only need to insert micro:bit into keyestudio relay shield, then input DC5V voltage on the relay VIN/GND port, pretty simple and convenient.
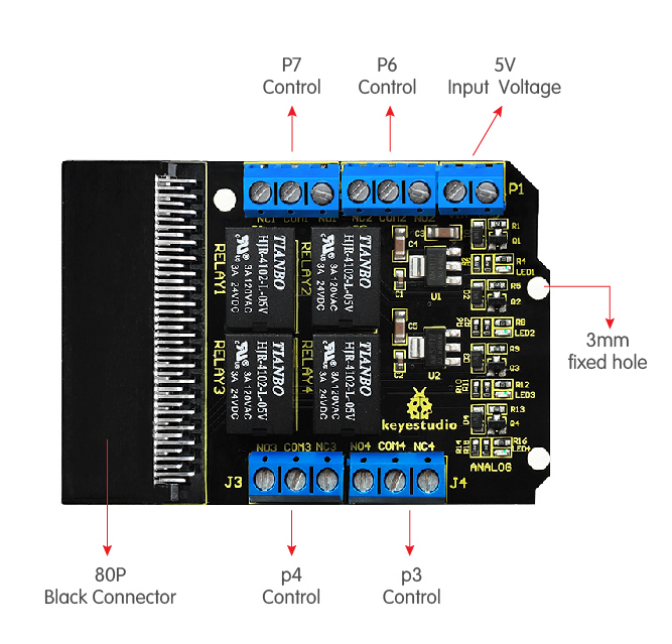
The 4-way relay on the breakout board is active HIGH. Its control terminals are respectively connected to P4, P3, P7 and P6 of the micro:bit development board. You only need to control the high or low output level of P4, P3, P7 and P6, thus control the 4 relay on/off.
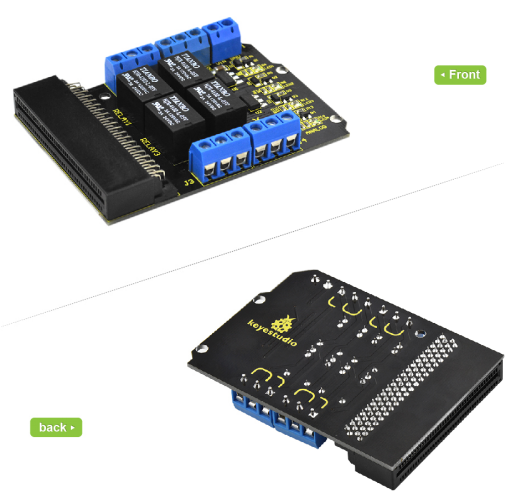
Note: we adopt V1.5 micro:bit in the whole tutorial, but our tutorial is also compatible with the latest version micro:bit. When doing experiment with latest micro:bit, you need to transfer code into Makecode online editor first, save code again then download it to micro:bit.
Parameters
- Input Voltage:DC 5V
- Working Mode:active at High level
- Contact Capacity: AC120V/3A ; DC24V/3A
PINOUTS Diagram
Test Program
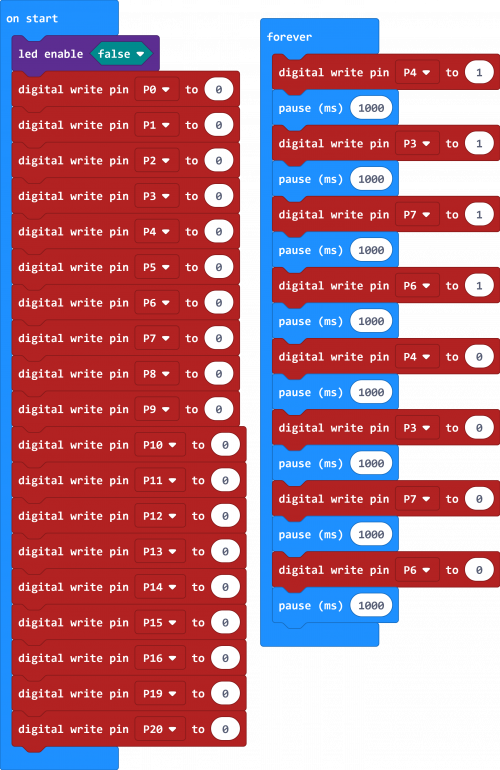
You can make the code below on the micro:bit Blocks Editor ; finally save the code and send it to your micro:bit.
Test Result
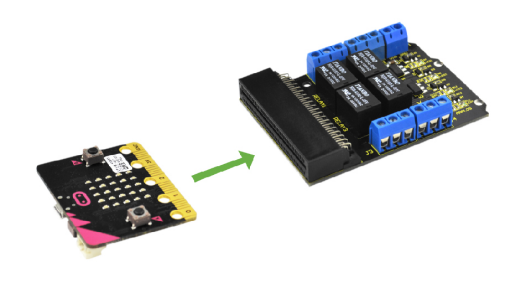
Insert micro:bit development board into keyestudio relay breakout board; send the code to micro:bit main board and power up, you can see the 4-way relay is connected and then disconnected one by one.
Go Further
You can connect the additional circuit to realize your project designs.
Note that here we use a power transfer module to supply voltage input 5V.
Finally the leds on 4-way relay breakout board are connected and then disconnected one by one, and the external LEDs are on and off one by one, circularly.
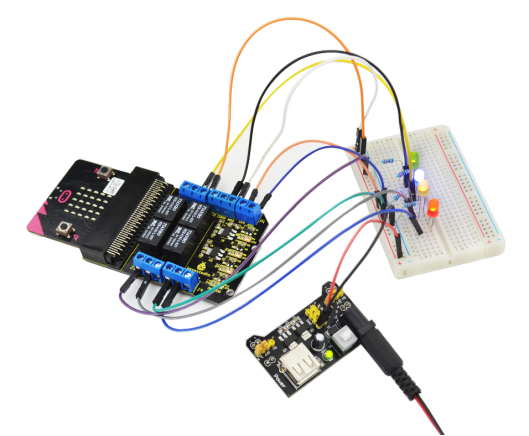
Note that the display accessories Not Included in the shipping list.
Resource
Download Datasheet and Code:
https://fs.keyestudio.com/KS0293
- BBC micro:bit website
- Micro:bit MakeCode Block Editor
- Meet micro:bit starter programming
- BBC micro:bit Features Guide
- BBC micro:bit Safety Warnings
- BBC micro:bit Quick Start Guide
- BBC micro:bit Pins
Buy From
You can get one now from the links below:
