Ks0357 Keyestudio 8x16 LED Matrix Panel: Difference between revisions
Keyestudio (talk | contribs) |
Keyestudio (talk | contribs) |
||
| Line 176: | Line 176: | ||
Set the display image<br> | <span style=color:red> '''Set the display image'''<br></span> | ||
You can set the display image in the code shown below. <br> | You can set the display image in the code shown below. <br> | ||
Revision as of 09:12, 3 February 2021
Description
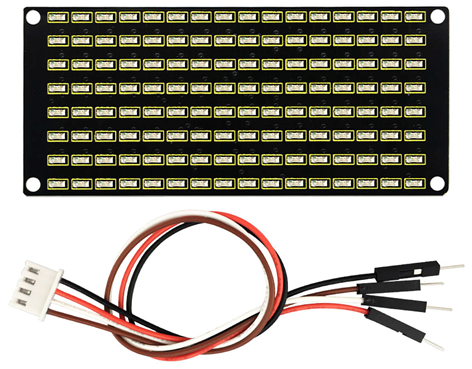
Keyestudio 8x16 LED matrix panel comes with 128 LEDs andAIP1640 chip welded on the back.
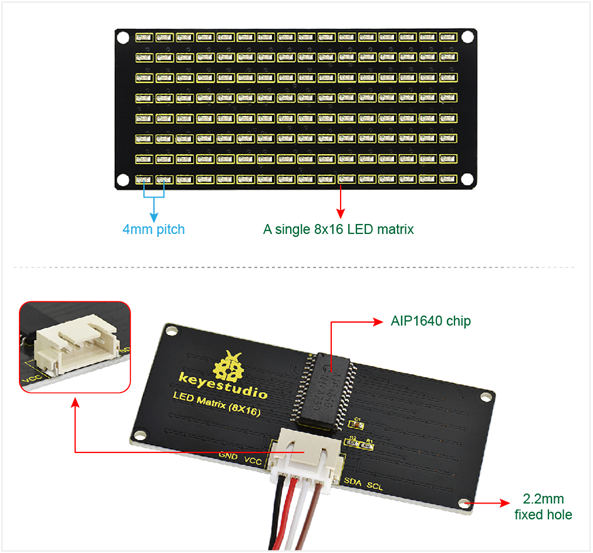
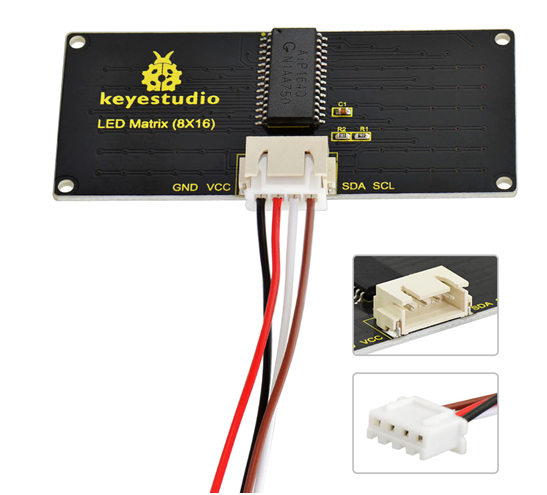
This matrix has 128 bright LEDs arranged in a 8x16 grid on the front. On the back there are aAIP1640 chip and a 4Pin interface (GND, VCC, SDA, SCL).
Communicate this matrix with microcontrollers via I2C communication. Through controlling the AIP1640 chip, thus control the 128 LEDs on the panel turn on or off, displaying the images you want to show on the LED matrix. And the brightness of LED displays can be set in the code below.
For easy wiring, it includes an HX-2.54 4Pin cable.
Comes with:
- A single 8x16 LED matrix- 4mm pitch
- An HX-2.54 4Pin cable
Features
- LEDs arranged in a 8x16 grid on the front
- Be driven by AIP1640 chip welded on the back
- Comes with a 4Pin interface
- With four 2.2mm fixed holes, easy to mount it on other devices.
Technical Details
- Operating Voltage: DC 3.3-5V
- Power loss: 400mW
- Oscillation frequency: 450KHz
- Driving current: 200mA
- Working temperature: -40~80°C
- Communication method: I2C communication
- Panel weight with 4PIN cable: 12.2g
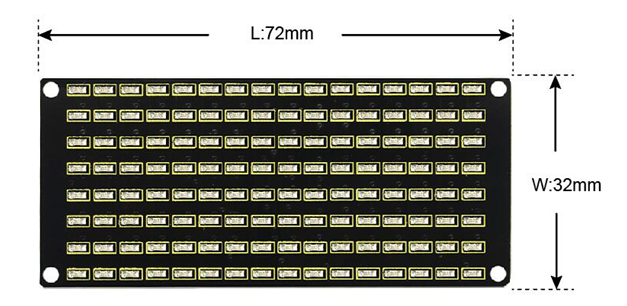
- Dimensions: 72mmx32mmx8mm
Dimensions
Connect it Up
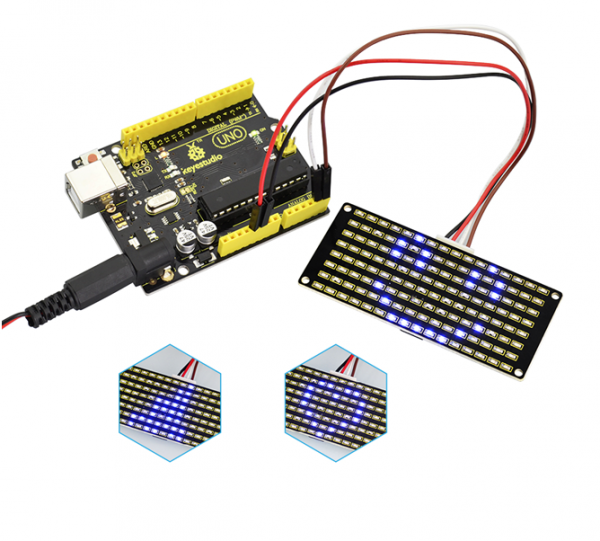
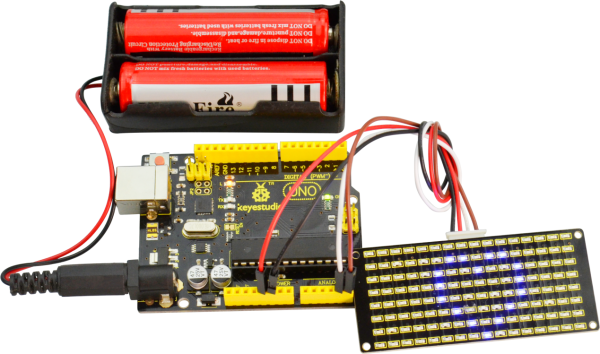
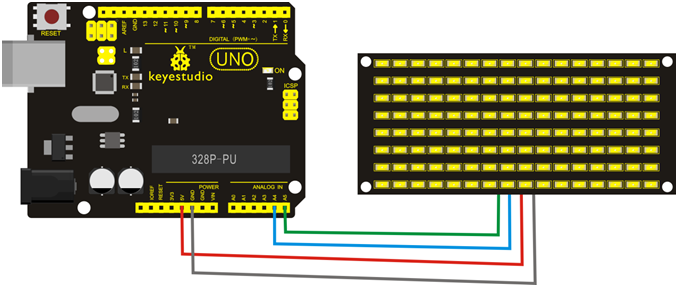
You can test this matrix panel with UNO board. You can easily connect them using an HX-2.54 4Pin cable. Connect the GND to GND, VCC to 5V, SDA to A4, SCL to A5.
Upload the Code
Below is an example code, you can copy and paste it on Arduino IDE.
//data display from right to left, from bottom to top, HIGH level display.
#define IIC_SCL  A5
#define IIC_SDA  A4

unsigned char data_line = 0;
unsigned char delay_count = 0;
unsigned char data_display1 = 0;
unsigned char data_display2 = 0;
unsigned char data_display3 = 0;
unsigned char data_display4 = 0;
unsigned char data_display5 = 0;
unsigned char data_display6 = 0;
unsigned char data_display7 = 0;
unsigned char data_display8 = 0;
unsigned char data_display9 = 0;
unsigned char data_display10 = 0;
unsigned char data_display11 = 0;
unsigned char data_display12 = 0;
unsigned char data_display13 = 0;
unsigned char data_display14 = 0;
unsigned char data_display15 = 0;
unsigned char data_display16 = 0;
void IIC_start();
void IIC_send(unsigned char send_data);
void IIC_end();
//unsigned char table[] = {0x01,0x02,0x04,0x08,0x10,0x20,0x40,0x80,0x80,0x40,0x20,0x10,0x08,0x04,0x02,0x01};
unsigned char table[4][16] = {
 {0x00,0x00,0x00,0x00,0x26,0x41,0x86,0x80,0x80,0x80,0x86,0x41,0x26,0x00,0x00,0x00},
 {0x00,0x00,0x00,0x00,0x00,0x1C,0x22,0x42,0x84,0x42,0x22,0x1C,0x00,0x00,0x00,0x00},
 {0x00,0x00,0x00,0x00,0x20,0x44,0x42,0x84,0x80,0x84,0x42,0x44,0x20,0x00,0x00,0x00},
 {0x00,0x00,0x00,0x00,0xC0,0x40,0xF8,0xD8,0x7E,0xFF,0xC0,0x00,0x00,0x00,0x00,0x00}};
void setup()
{
  pinMode(IIC_SCL,OUTPUT);
  pinMode(IIC_SDA,OUTPUT);
  digitalWrite(IIC_SCL,LOW);
  digitalWrite(IIC_SDA,LOW);
}
/*----------------------------------------------------------------*/
void loop()
{
    /**************set the address plus 1***************/
    IIC_start();
    IIC_send(0x40);// set the address plus 1 automatically
    IIC_end();
    /************end the process of address plus 1 *****************/
    /************set the data display*****************/
    IIC_start();
    IIC_send(0xc0);// set the initial address as 0
    for(char i = 0;i < 16;i++)
    {
       IIC_send(table[data_line][i]);// send the display data
    }
    if(++delay_count >= 10)
    {
      delay_count = 0;
      data_line++;
      if(data_line >= 4)
      {
        data_line = 0;
      }
    }

    IIC_end();
    /************end the data display*****************/
    /*************set the brightness display***************/
    IIC_start();
    IIC_send(0x8A);// set the brightness display
    IIC_end();
    /*************end the brightness display***************/
    delay(100);
}
/*----------------------------------------------------------------*/
void IIC_start()
{
  digitalWrite(IIC_SCL,LOW);
  delayMicroseconds(3);
  digitalWrite(IIC_SDA,HIGH);
  delayMicroseconds(3);
  digitalWrite(IIC_SCL,HIGH);
  delayMicroseconds(3);
  digitalWrite(IIC_SDA,LOW);
  delayMicroseconds(3);
}
void IIC_send(unsigned char send_data)
{
  for(char i = 0;i < 8;i++)
  {
      digitalWrite(IIC_SCL,LOW);
      delayMicroseconds(3);
      if(send_data & 0x01)
      {
        digitalWrite(IIC_SDA,HIGH);
      }
      else
      {
        digitalWrite(IIC_SDA,LOW);
      }
      delayMicroseconds(3);
      digitalWrite(IIC_SCL,HIGH);
      delayMicroseconds(3);
      send_data = send_data >> 1;
  }
}
void IIC_end()
{
  digitalWrite(IIC_SCL,LOW);
  delayMicroseconds(3);
  digitalWrite(IIC_SDA,LOW);
  delayMicroseconds(3);
  digitalWrite(IIC_SCL,HIGH);
  delayMicroseconds(3);
  digitalWrite(IIC_SDA,HIGH);
  delayMicroseconds(3);
}
What You Should See
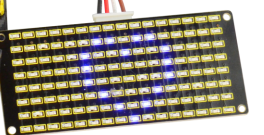
Upload well the above code to the board, you should see the LED matrix show different images like a heart and a smile.
Set the display image
You can set the display image in the code shown below.
unsigned char table[4][16] = {
{0x00,0x00,0x00,0x00,0x26,0x41,0x86,0x80,0x80,0x80,0x86,0x41,0x26,0x00,0x00,0x00},
{0x00,0x00,0x00,0x00,0x00,0x1C,0x22,0x42,0x84,0x42,0x22,0x1C,0x00,0x00,0x00,0x00},
{0x00,0x00,0x00,0x00,0x20,0x44,0x42,0x84,0x80,0x84,0x42,0x44,0x20,0x00,0x00,0x00},
{0x00,0x00,0x00,0x00,0xC0,0x40,0xF8,0xD8,0x7E,0xFF,0xC0,0x00,0x00,0x00,0x00,0x00}};
We set four images, the second one is heart pattern.
Place the matrix module as follows:
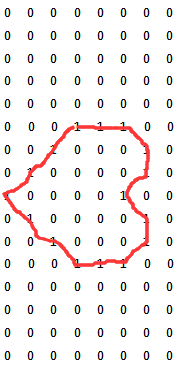
Then convert 0x00,0x00,0x00,0x00,0x00,0x1C,0x22,0x42,0x84,0x42,0x22,0x1C, 0x00,0x00,0x00,0x00 into Binary number:
0x00 should be 0 0 0 0 0 0 0 0
0x00 should be 0 0 0 0 0 0 0 0
0x00 should be 0 0 0 0 0 0 0 0
0x00 should be 0 0 0 0 0 0 0 0
0x00 should be 0 0 0 0 0 0 0 0
0x1C should be 0 0 0 1 1 1 0 0
0x22 should be 0 0 1 0 0 0 1 0
0x42 should be 0 1 0 0 0 0 1 0
0x84 should be 1 0 0 0 0 1 0 0
0x42 should be 0 1 0 0 0 0 1 0
0x22 should be 0 0 1 0 0 0 1 0
0x1C should be 0 0 0 1 1 1 0 0
0x00 should be 0 0 0 0 0 0 0 0
0x00 should be 0 0 0 0 0 0 0 0
0x00 should be 0 0 0 0 0 0 0 0
0x00 should be 0 0 0 0 0 0 0 0
The first hexadecimal number represents the control of the first column of LEDs. The second data represents the control of the second column of LEDs. And so on.
The settings is converting Hexadecimal data into binary data 8-bit.
The number 1 means LED on.
The first converted number is controlling the eighth row of LED on and off, and so on.
Note: we can convert images into setting data via software. The detailed method is in the following link:
https://wiki.keyestudio.com/Ks0428_keyestudio_Mini_Tank_Robot_V2#Project_9:_LED_Expression_Panel
Resources
