KS0320 Keyestudio Electromagnet Module (Black and Environmental-friendly): Difference between revisions
Keyestudio (talk | contribs) |
Keyestudio (talk | contribs) No edit summary |
||
| Line 1: | Line 1: | ||
<br>[[File:KS0320 图片1.png|500px| | <br>[[File:KS0320 图片1.png|500px|right|thumb| Keyestudio Electromagnet Module ]]<br> | ||
<br> | |||
== Description == | == Description == | ||
This module mainly contains an electromagnet. A magnet that generates a magnetic field from an electric current. <br> | This module mainly contains an electromagnet. A magnet that generates a magnetic field from an electric current. <br> | ||
| Line 11: | Line 11: | ||
<br>[[File:KS0320 电磁铁模块 黑色 (6).jpg|500px|frameless|thumb]]<br> | <br>[[File:KS0320 电磁铁模块 黑色 (6).jpg|500px|frameless|thumb]]<br> | ||
<br> | |||
== Features == | == Features == | ||
*Small electromagnet induction, with high strength suction. | *Small electromagnet induction, with high strength suction. | ||
| Line 16: | Line 17: | ||
*Electromagnet electric iron shell, less remanence, integrated molding, strong magnetic conductivity. | *Electromagnet electric iron shell, less remanence, integrated molding, strong magnetic conductivity. | ||
<br> | |||
== Parameters == | == Parameters == | ||
* Working Voltage: 3.3-5V | * Working Voltage: 3.3-5V | ||
* Wiring Type: 3PIN | * Wiring Type: 3PIN | ||
<br>[[File:KS0320 图片2.png| | <br> | ||
== PINOUTS== | |||
<br>[[File:KS0320 图片2.png|600px|frameless|thumb]]<br> | |||
<br> | |||
== Connection Diagram == | == Connection Diagram == | ||
Connect up this module and UNO board like this: SIG pin to Digital port 3, VCC pin to 5V, GND pin to the ground port. Shown as below. | Connect up this module and UNO board like this: SIG pin to Digital port 3, VCC pin to 5V, GND pin to the ground port. Shown as below.<br> | ||
<br>[[File:KS0320 图片3.png|500px|frameless|thumb]]<br> | <br>[[File:KS0320 图片3.png|500px|frameless|thumb]]<br> | ||
<br> | |||
== Example Code == | == Example Code == | ||
Now, open up the Arduino IDE and type in the following code: | Now, open up the Arduino IDE and type in the following code: <br> | ||
<pre> | <pre> | ||
int Solenoid = 3; //define digital port 3 | int Solenoid = 3; //define digital port 3 | ||
| Line 45: | Line 49: | ||
</pre> | </pre> | ||
<br> | |||
== Example Result == | == Example Result == | ||
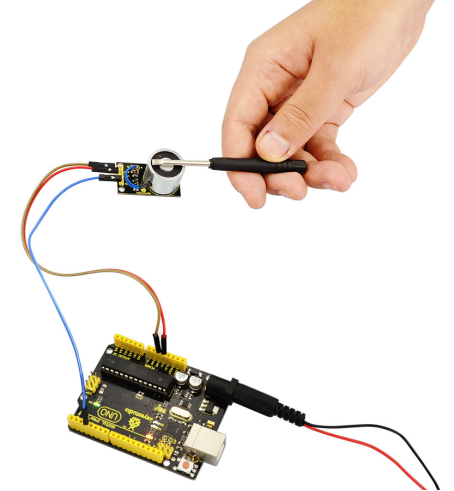
After wiring, upload the above code to the board, if put an iron screwdriver close to the electromagnet module, they should be available to attract together for two seconds, then lose its magnetic attraction for two seconds, circularly. | After wiring, upload the above code to the board, if put an iron screwdriver close to the electromagnet module, they should be available to attract together for two seconds, then lose its magnetic attraction for two seconds, circularly.<br> | ||
<br>[[File:KS0320 图片4.png| | <br>[[File:KS0320 图片4.png|600px|frameless|thumb]]<br> | ||
<br> | |||
== Resources == | == Resources == | ||
*[https://drive.google.com/open?id=13uK39ObCEFyimm_VRRe6UO5V7PYpzfmS Click here to download the datasheet ] | |||
[https://drive.google.com/open?id= | *[https://drive.google.com/open?id=1_euzRwodtgW1swHLw8V5N2A-acKsDTX1 Click here to download the code] | ||
<br> | |||
== Buy From == | == Buy From == | ||
*[https://www.keyestudio.com/new-keyestudio-electromagnet-module-for-arduino-diy-projects-p0057.html Official website ] | |||
*[https://www.aliexpress.com/store/product/NEW-Keyestudio-Electromagnet-Module-For-Arduino-DIY-Projects/1452162_32890500288.html?spm=2114.12010615.8148356.1.2c2e51daooADFt Shop on aliexpress ] | |||
*[https://www.amazon.com/KEYESTUDIO-Electromagnet-Module-Arduino-Environmental-Friendly/dp/B07H3V8N2Q?ref_=w_bl_hsx_s_pc_web_13497667011 Shop on amazon] | |||
Revision as of 14:40, 29 April 2019
Description
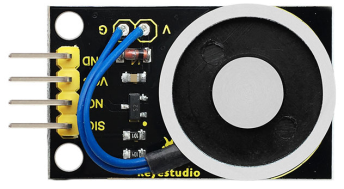
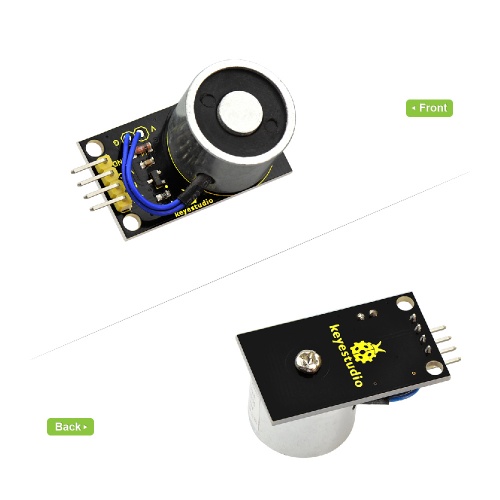
This module mainly contains an electromagnet. A magnet that generates a magnetic field from an electric current.
It uses the principle of electro-magnetic. With a straight metal wire passing through the current, the space around the wire will produce a circular magnetic field. In order to concentrate the magnetic field, the coil inside the electromagnet is wound into a coil, and many lines are arranged side by side, so that all the magnetic fields of the coil pass through the center of the coil, forming a strong magnetic field there, which can make it absorb a 1kg ferromagnetic.
When using this module, you can control the electromagnet on and off by controlling the High or Low level on its Signal end.
Features
- Small electromagnet induction, with high strength suction.
- Electromagnet built-in pure copper coil, strong conductivity, low power consumption.
- Electromagnet electric iron shell, less remanence, integrated molding, strong magnetic conductivity.
Parameters
- Working Voltage: 3.3-5V
- Wiring Type: 3PIN
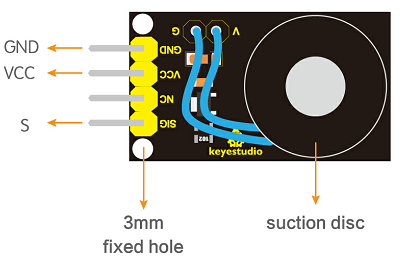
PINOUTS
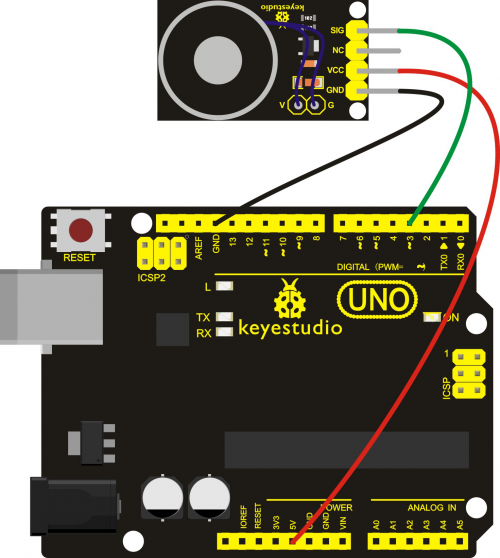
Connection Diagram
Connect up this module and UNO board like this: SIG pin to Digital port 3, VCC pin to 5V, GND pin to the ground port. Shown as below.
Example Code
Now, open up the Arduino IDE and type in the following code:
int Solenoid = 3;    //define digital port 3
 void setup()
 {
  pinMode(Solenoid, OUTPUT);  //set Solenoid as OUTPUT
}
 void loop()
{
  digitalWrite(Solenoid, HIGH);// Solenoid is effective
  delay(2000); // delay 2S
  digitalWrite(Solenoid, LOW);  // Solenoid is non-effective
  delay(2000);  //delay 2S
}
Example Result
After wiring, upload the above code to the board, if put an iron screwdriver close to the electromagnet module, they should be available to attract together for two seconds, then lose its magnetic attraction for two seconds, circularly.
Resources
Buy From
Category:Module
