Ks0153 keyestudio JoyStick Shield: Difference between revisions
Keyestudio (talk | contribs) No edit summary |
Keyestudio (talk | contribs) |
||
| (30 intermediate revisions by the same user not shown) | |||
| Line 1: | Line 1: | ||
[[image:KS0153.jpg|thumb|500px|right|Keyestudio JoyStick Shield]] | |||
<br> | |||
==Introduction== | ==Introduction== | ||
Keyestudio Joystick Shield is particularly developed for you to design your own game machines. <br> | |||
Meanwhile, JoyStick Shield has a cross-shape PS2 joystick with button. There are four round buttons, 2 small buttons, providing input expansion for Arduino joystick and buttons. Onboard | It adds an nRF24L01 RF interface and Nokia 5110 LCD interface, easy for secondary game development. Because this RF module has stable performance, and supports 6 in 1 game play, which allows developers to play freely. Nokia 5110 LCD is widely used in various development platforms, with highly cost-effective and has a strong library support. | ||
Here, we add enhanced Nokia5110 display library, including display bitmap, draw point line circle flip and so on.<br> | |||
It also adds a Bluetooth module interface, for convenient Bluetooth wireless serial communication, and a I2C communication interface for I2C devices connection. <br> | |||
Meanwhile, JoyStick Shield has a cross-shape PS2 joystick with button. There are four round buttons, 2 small buttons, providing input expansion for Arduino joystick and buttons. Onboard slide switch can switch between 3.3V and 5V.<br> | |||
<br> | |||
==Specification== | |||
* Compatible with UNO R3 and MEGA 2560 control board. | |||
* Comes with a joystick button: X- (connected to A0); Y- (connected to A1); button (connected to D8). | |||
* 4 round buttons with cap: button A (D2); button B (D3); button C (D4); button D (D5). | |||
* 2 small buttons: button E (D6); button F (D7) | |||
* A slide switch: control the output voltage of V end for 3.3V or 5V. (Note: V end can also power up the joystick element) | |||
* Adds a nRF24L01 interface | |||
* Adding Nokia 5110 LCD headers | |||
* Adding Bluetooth module interface | |||
<br> | |||
==PCB Dimensions== | |||
<br>[[File:KS0153-1.png|600px|frameless|thumb]]<br> | |||
<br> | |||
==Pinout Instructions== | |||
<br>[[File:KS0153-2.png|800px|frameless|thumb]]<br> | |||
<br> | |||
==Connect it Up== | |||
Stack well the shield onto UNO R3 board, slide the switch to 5V. | |||
<br>[[File:KS0153-3.jpg|600px|frameless|thumb]]<br> | |||
<br> | |||
==Upload the Code== | |||
Below is an example code, you can copy and paste it on [http://wiki.keyestudio.com/index.php/Download_Arduino_IDE Arduino IDE]. | |||
* [http://wiki.keyestudio.com/index.php/How_to_Download_Arduino_IDE Download Arduino IDE ] | |||
* [http://wiki.keyestudio.com/index.php/How_to_Install_Arduino_Driver Install Arduino Driver] | |||
<pre> | |||
void setup() | |||
{ | |||
for(int i=2; i<9; i++) | |||
{ | |||
pinMode(i, INPUT); | |||
digitalWrite(i, 1); | |||
} | |||
Serial.begin(9600); | |||
} | |||
void loop(){ | |||
int i, someInt, flag = 0; | |||
for(i=2; i<9; i++) | |||
{ | |||
someInt = digitalRead(i); | |||
if(someInt == 0) | |||
{ | |||
flag =1; | |||
break; | |||
} | |||
} | |||
if(flag == 1) | |||
{ | |||
switch(i) | |||
{ | |||
case 2: Serial.println("--------> Button A"); break; | |||
case 3: Serial.println("--------> Button B"); break; | |||
case 4: Serial.println("--------> Button C"); break; | |||
case 5: Serial.println("--------> Button D"); break; | |||
case 6: Serial.println("--------> Button E"); break; | |||
case 7: Serial.println("--------> Button F"); break; | |||
case 8: Serial.println("--------> Button KEY"); break; | |||
default: break; | |||
} | |||
flag=0; | |||
delay(200); | |||
} | |||
int sensorValue1 = analogRead(A0); | |||
Serial.print("X = "); | |||
Serial.println(sensorValue1 ); | |||
int sensorValue2 = analogRead(A1); | |||
Serial.print("Y = "); | |||
Serial.println(sensorValue2); | |||
delay(200); | |||
} | |||
</pre> | |||
<br> | |||
==What You Should See?== | |||
Upload the above code to the board, open the serial monitor and set the baud rate as 9600. <br> | |||
You should see the X, Y data of joystick element. Press the button A,B,C and D, the data will be displayed on the monitor. | |||
<br>[[File:KS0153-4.jpg|600px|frameless|thumb]]<br> | |||
<br>[[File:KS0153-5.jpg|600px|frameless|thumb]]<br> | |||
<br> | |||
==For Applications== | |||
Plug the joystick shield onto keyestudio UNO R3 board, you can connect a LCD and temperature and humidity sensor to build the circuit experiment. | |||
<br>[[File:KS0153-6.png|800px|frameless|thumb]]<br> | |||
==Resources== | |||
https://fs.keyestudio.com/KS0153 | |||
<br> | |||
==Get One Now == | ==Get One Now == | ||
*[https://www.keyestudio.com/free-shipping-keyestudio-joystick-shield-ps2-for-arduino-nrf24l01-nk-5110-lcd-i2c-p0144.html '''Official Website'''] | |||
* [https://www.aliexpress.com/item/Keyestudio-JoyStick-P-S2-Shield-V1-0-for-Arduino-NRF24L01-Nk-5110-LCD-I2C/32903003622.html?spm=2114.search0104.3.21.1f335c25oAbOeE&ws_ab_test=searchweb0_0,searchweb201602_4_10152_10065_10151_10344_10068_10342_10325_10343_10546_10340_10059_10341_10548_10696_100031_10084_10083_10103_10618_10307_10624_10623_10622_10621_10620,searchweb201603_1,ppcSwitch_7&algo_expid=a8c7e174-7095-49e3-9e02-bc53527012bf-3&algo_pvid=a8c7e174-7095-49e3-9e02-bc53527012bf&priceBeautifyAB=0 '''From Aliexpress store:''' ] | |||
* [https://www.ebay.com/itm/132596058329 '''From eBay store:''' ] | |||
[[Category: Arduino Shield]] | |||
[[Category: | |||
Latest revision as of 10:31, 29 April 2021
Introduction
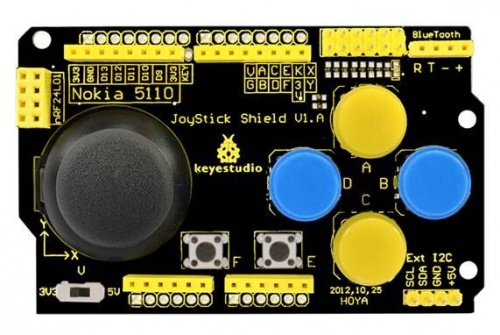
Keyestudio Joystick Shield is particularly developed for you to design your own game machines.
It adds an nRF24L01 RF interface and Nokia 5110 LCD interface, easy for secondary game development. Because this RF module has stable performance, and supports 6 in 1 game play, which allows developers to play freely. Nokia 5110 LCD is widely used in various development platforms, with highly cost-effective and has a strong library support.
Here, we add enhanced Nokia5110 display library, including display bitmap, draw point line circle flip and so on.
It also adds a Bluetooth module interface, for convenient Bluetooth wireless serial communication, and a I2C communication interface for I2C devices connection.
Meanwhile, JoyStick Shield has a cross-shape PS2 joystick with button. There are four round buttons, 2 small buttons, providing input expansion for Arduino joystick and buttons. Onboard slide switch can switch between 3.3V and 5V.
Specification
- Compatible with UNO R3 and MEGA 2560 control board.
- Comes with a joystick button: X- (connected to A0); Y- (connected to A1); button (connected to D8).
- 4 round buttons with cap: button A (D2); button B (D3); button C (D4); button D (D5).
- 2 small buttons: button E (D6); button F (D7)
- A slide switch: control the output voltage of V end for 3.3V or 5V. (Note: V end can also power up the joystick element)
- Adds a nRF24L01 interface
- Adding Nokia 5110 LCD headers
- Adding Bluetooth module interface
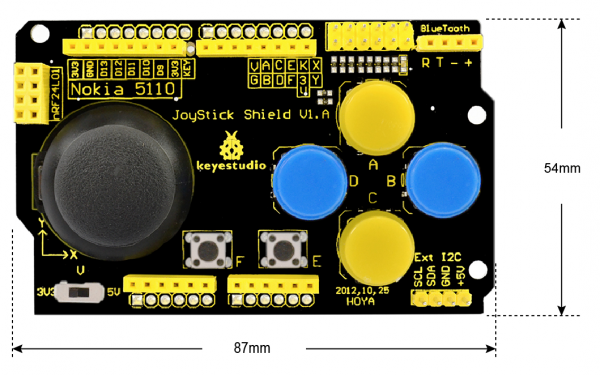
PCB Dimensions
Pinout Instructions
Connect it Up
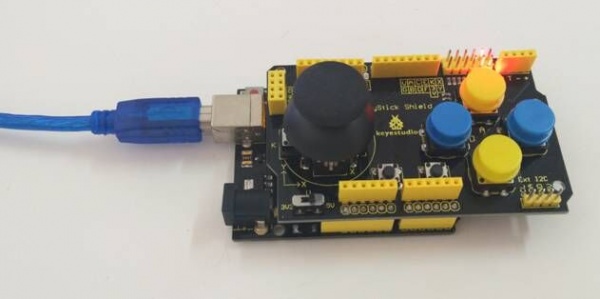
Stack well the shield onto UNO R3 board, slide the switch to 5V.
Upload the Code
Below is an example code, you can copy and paste it on Arduino IDE.
void setup()
{
  for(int i=2; i<9; i++)
  {
    pinMode(i, INPUT);
    digitalWrite(i, 1);
  }
  Serial.begin(9600);
}
void loop(){
  int i, someInt, flag = 0;
  for(i=2; i<9; i++)
  {
    someInt = digitalRead(i);
    if(someInt == 0)
    {
      flag =1;
      break;
    }
   }
   if(flag == 1)
   {
     switch(i)
     {
       case 2: Serial.println("--------> Button A"); break;
       case 3: Serial.println("--------> Button B"); break;
       case 4: Serial.println("--------> Button C"); break;
       case 5: Serial.println("--------> Button D"); break;
       case 6: Serial.println("--------> Button E"); break;
       case 7: Serial.println("--------> Button F"); break;
       case 8: Serial.println("--------> Button KEY"); break;
       default: break;
     }
     flag=0;
     delay(200);
   }
   int sensorValue1 = analogRead(A0);
   Serial.print("X = ");
   Serial.println(sensorValue1 );
   int sensorValue2 = analogRead(A1);
   Serial.print("Y = ");
   Serial.println(sensorValue2);
   delay(200);
}
What You Should See?
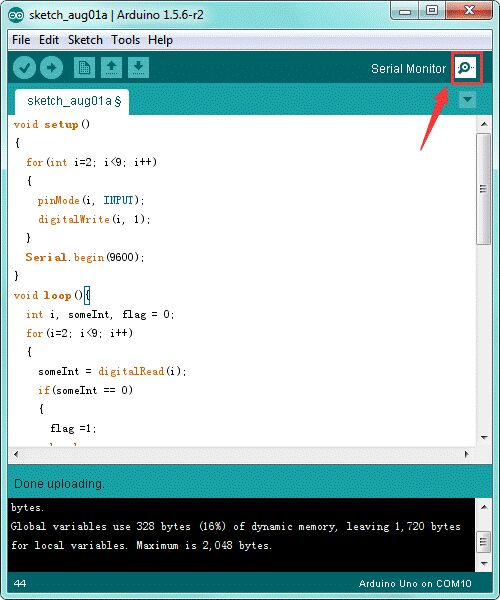
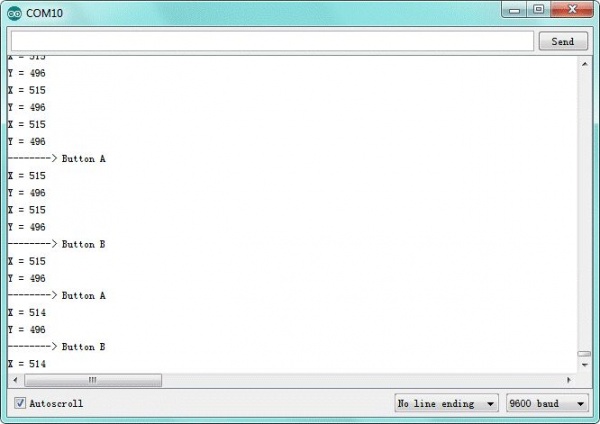
Upload the above code to the board, open the serial monitor and set the baud rate as 9600.
You should see the X, Y data of joystick element. Press the button A,B,C and D, the data will be displayed on the monitor.
For Applications
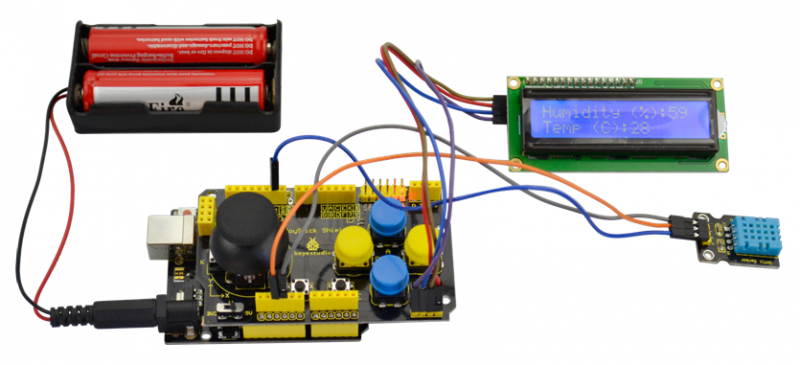
Plug the joystick shield onto keyestudio UNO R3 board, you can connect a LCD and temperature and humidity sensor to build the circuit experiment.
Resources
https://fs.keyestudio.com/KS0153
